Day 45 - November 24, 2012

The fiberglass is nearing the end of its smoothing process.  We applied another layer of filler to it just to make it super smooth.


We sanded the upper cowling half a little bit and exposed all of these pinholes that will need to be filled before we paint it.


Here is the lower cowling duct that guides air from the front of the cowling to the oil cooler near the firewall.


The battery and oil tank were installed on the firewall.


And so was the oil cooler.

    
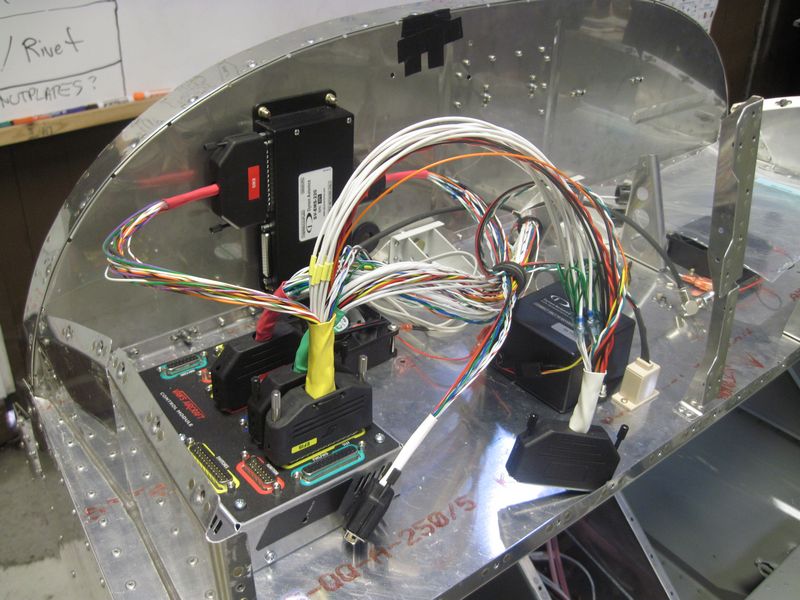
Our avionics started to go together with the installation of the computer module, the EMS (engine monitoring system), and the Dynon backup battery.  We have it pretty easy though compared to most homebuilders, for our wires come in prepackaged bundles so we can just plug-n'-play.


More next week!

Day 43 - November 10, 2012 & Day 44 - November 17, 2012

The engine is continuing to come together for its application in the TeenFlight airplane.  The cooling shroud that fits snugly over the cylinders to effectively cool them uniformly was hacked to size and then glued onto the crankcase of the engine using high temperature silicone RTV.

One of the last steps of the engine customization is the installation of drip pans underneath the carburators. 


We wrestled the engine mount onto the back end of the engine and torqed down all of the bolts that hold the mount to the engine.

Shown here is the clamp assembly where the different fuel hoses are held together.


After failing many pressure tests we figured out that the "visual fuel level check window" was the culprit of our less than air-tight fuel tank.


More sanding on the fiberglass lay-ups was completed.  It is becoming really smooth.  The crew that has been working on it spread another layer of fiberglass filler over some of the low spots.


When we arrived at the hangar on Saturday there were multiple boxes sitting on one of the tables: The Avionics Kit.  (Shown here is the larger-than-iPad size screen of the Dynon SkyView D1000 PFD)
Happy Thanksgiving!

Day 41 - October 27, 2012 & Day 42 - November 3, 2012

Over the last two weeks, the TeenFlight crew has been working on the engine preparation and installation process.  Although the engine comes completely assembled, there are a lot of little things to tweak on it to suit its application and compatibility "under the hood" of the RV-12.

 One of the things that the RV-12 requires is the installation of a cooling shroud that fits snugly over the top of the main part of the cylinders.  This requires that we remove the carburetors, the ignition modules, and the cooling system, and flip them back to access this area.


This is how the cooling shroud fits over the cylinders.  After it is trimmed down to size, the gaps between the fiberglass and the engine will be filled with RTV (Room Temperature Vulcanizing) silicone caulk.  The purpose of the cooling shroud is to directly blast air evenly onto all four of the cylinders by way of a hose that runs from the cowling to the top of the shroud.


Other pieces of the firewall-forward kit that we worked on were the oil cooler and its bracket.  It will eventually be installed under the engine and will face forwards out of the cowling.
 
More next week.