Day 7 - December 21, 2013

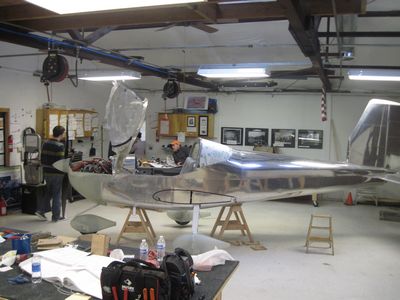
It is exciting to see the progress and the excitement around the TeenFlight hangar on Saturdays.  The TeenFlight 3 crew is really getting into the build.  The mentors divided the students into four teams: Purple, Red, Green, and Blue.  Each of these teams consists of three or four students.  The teams have mentors that work directly with them on their individual projects.  Because the fuselage kit has so many different facets to it, each team has its own project to work on.  These small projects will eventually join together as the fuselage of the airplane.   
 
The blue team continued on the forward lower fuselage section of the fuselage kit. 
 

Teams Green and Purple spent their time preparing seat ribs, baggage ribs, the forward cabin bulkhead, and other small assemblies.
 

Team Red finished the center section and began attaching the baggage ribs and floors to the center section.
 

Day 5 - December 7, 2013

Airplane parts are here! The fuselage kit magically showed up at the hangar for us to begin work on.  The plans sequences the tail kit as the first kit to be built.  Once the tail kit is complete, the builder moves on to the wing kit and then finally on to the fuselage kit.  However, the plans are laid out for a single person building the airplane and the idea is to get them building the easier (and cheaper) parts first where they will gain experience on parts that are easy to replace if need be.  For a few reasons, the TeenFlight crew has decided to switch the sequencing around a bit to suit our needs.  With the last two projects we have progressed more or less with the sequence laid out by the plans.  The problem was that once we got to the fuselage section there was not enough work for a dozen students.  This required splitting the students up into two or three teams to come on alternating weeks.  By starting with the fuselage kit we hope to hit that "bottleneck" soon in the build process and be able to have the wing and tail kits available so there will not be a surplus of willing students and a lack of available work.


All the students finished their toolbox projects this week and now have the basic skills necesary to begin construction of the airplane.


After inventorying the fuselage kit, the students were split up into four teams: Red, Blue, Green, and Purple.  Each team was assigned a specific place in the plans to begin work.  For the last hour or so of the day, we actually began to work on real airplane parts! 


Day 2 - November 16, 2013 & Day 3 - November 23, 2013

TeenFlight 3 is in full swing.  We have been practicing aircraft construction skills by each building a practice project called OP-51.  This project covers 51 different techniques and provides a good place to learn how to fix mistakes.  

A completed OP-51 project

After we finished the OP-51 project, we began on the final practice project: the toolbox.  We each received a toolbox kit, and by the end of Day 3, we had all begun construction on them.

A toolbox project under construction


TeenFlight 3: Day 1 - November 9, 2013

It is my pleasure to announce that the TeenFlight program has begun its third RV-12 build project.  Today was the first Saturday session with the new batch of students.  In all there are thirteen students from various backgrounds and ages ranging from 14 to 17.


This first session served primarily as an orientation session for students to get acquainted with the mentors and begin to learn a few basic procedures required to build an airplane.  Instead of having one mentor lecture for the entire day, it was decided by the group of about a dozen mentors that the task of teaching should be divided up in an attempt to make the material more interesting to the students.  As well as lectures  about safety, material preparation, drilling, and riveting, the students completed their first project: a name tag.  At the end of the day, and after more lecturing, we dove into the OP-51 instruction project.

Another point of interest is that the TeenFlight 2 RV-12 has successfully been sold!  We are very excited about this as it will provide the needed funds for the purchase of the RV-12 kit for the TeenFlight 3 project.

Paint, Graduation, and off to OshKosh!

Over the last weeks, the TeenFlight crew has been very busy preparing N212TF for its coat of paint, and for its trip to OshKosh.  Last week, it was painted at the Vans Aircraft factory in the same paint scheme as its older brother, N112TF.


Here is the finished TeenFlight 2 RV-12, N212TF!  On Friday the 26th of July, N212TF will launch from Aurora State Airport for Airventure OshKosh.


On Saturday, July 20, 2013, TeenFlight held a graduation to celebrate the successful completion of two RV-12s


It has been a great ride!  In fact, there are rumors about TeenFlight 3 starting sometime soon.  Stay tuned for more!

First Flight and Flight Testing!


N212TF made its first brief flight on the morning of June 6, 2013 at the Portland Hillsboro Airport with Mr. Dick VanGrunsven at the controls. 

After some obligatory tweaking, the airplane began its flight testing a week later.  At this point, the airplane has about three hours on it and is going strong.
 

Day 70 - June 1, 2013

With the inspection finished, and the airplane mostly buttoned back up, we had very few things to complete to get the airplane in flying condition.  We wanted to accomplish every possible task so that the airplane would be ready to fly on a moment's notice when the weather improved.


All the upholstery went into the cabin as well as the ELT and all the access plates.


Day 68 - May 18, 2013 & Day 69 - May 25, 2013

TeenFlight 2 is legally airworthy!  Early on Saturday Mr. Frank Snead, DAR, came over to the TeenFlight hangar and inspected the RV-12.  The inspection was very fast, and he did not find anything amiss with the airplane.  After reviewing the aircraft paperwork, he awarded us our airworthiness certificate.


After the inspection was complete, we began the process of buttoning up the airplane.  This included installing all the cover plates, reinstalling the fuel tank, and installing the upholstery.
 
When all the cover plates had been installed, the interior of the airplane went from looking like this:
 

to looking like this:


 Stay tuned for more in the coming weeks including the first flight of the second TeenFlight RV-12.

Day 67 - May 11, 2013

The last few weeks have been fairly sparse on tasks at TeenFlight.  We have been waiting on the FAA to return our aircraft registration.  However we received that this week but are now waiting for approval to schedule a DAR (Designated Airworthiness Representative).  This week we completed a few small things that will help the airplane be ready for the DAR when he comes.

We installed the rest of the placard on the airframe and inside the cabin.


In order to weigh the airplane the seats and upholstery must be completely installed.  One of the mentors brought in some scales for us to use and, with those scales, we were able to calculate the empty weight of the airplane at each tire and from there find the balance of the airplane.


And finally, this is what happens right after someone pulls off the protective plastic cling-wrap on the canopy.


Day 64 - April 13, 2013 & Day 65 - April 20, 2013

Over the past two weeks we have been working on finishing the wheel fairing kit.  They went together very smoothly for the most part and look very good.  There are only a few things left to do with them before they are fully completed. 
 

Shown here are the brackets that the main gear fairings screw into.
 

The nose wheel fairing was probably the hardest fairing of the three to construct, because it screwed into the fork that holds the nose wheel (instead of brackets like on the main wheels) and had to clear the gear leg.
 

We installed more velcro for the interior panels.
 

Day 63 - April 6, 2013

This week we worked more on the wheel fairing kit.  It required lots of trimming, sanding, and in some cases pulling out the rivet squeezer and setting some rivets.  We were not quite able to finish the wheel fairing kit this week, but we came very close.

The bane of fiberglass is pinholes.  Filling the larger ones requires filling them in with a resin based filler and then sanding the excess off.  For the small pinholes that are not covered by the resin based filler, a special filler is used that wicks into the holes to fill them.


The left main wheel fairing.


The nose gear fairing proved to be much more difficult than we had expected.  It provided a nice challenge to test everything we have learned over the course of the program.


Once attached, the wheel fairings make the airplane look very sleek.


More next week!

Day 62 - March 30, 2013

This session we started on the wheel fairing kit.  We spent the whole session sanding, trimming, fitting, and sanding again.  Each main wheel will have a fairing over it, and the nose wheel and the nose wheel gear leg will also have a fairing for aerodynamics.  When properly installed, the wheel fairings will add approximately five knots of speed, a nice boost of performance.  Plus, they will add lots of style points too.


Day 61 - March 23, 2013

This week we ran the engine.  We attached a suction gauge to the carburetors in order to balance them, so that one side of the engine did not run at a leaner or richer setting than the other side.  Many of the students came out to watch the engine run.

Before lunch, we attached the suction gauge to the carburetors.  We hooked it to the pressure compensation tube attach point on each carburetor.  The suction gauge had long enough tubes that we could read it all the way back in the cockpit.


With the arrival of the upholstery last week, the seat belts arrived this week.  They are a nice medium grey which goes very well with the light and dark grey seats, and the dark grey carpet.  


Here's a short video of the engine run:


As we approach the end of the TeenFlight 2 build, we might not hold weekly work sessions.  We are working on the registration paperwork for the FAA so that we can start the certification process.  Paint is coming soon, as well as inspection and first flight.  It just keeps getting more and more exciting!


Day 59 - March 9, 2013 & Day 60 - March 16, 2013

The last two weeks have been filled with finishing details; as we complete the airplane and prepare for the inspection and first flight.

Last week, we finished tweaking the wiring behind the instrument panel and attached the upper forward fuselage skin with all its screws.  Because of the possible glare factor of silver headed screws, a mentor picked up some nice black screws that practically blend into the black, wrinkle-coated panel.  After securing the panel and upper forward fuselage skin, we bolted the canopy into its position.  We added oil to the oil tank near the end of the day and, by putting the oil under pressure, forced it through the lines to purge the system.

This week, we were very excited to receive our upholstery kit.  The colors are grey and dark grey to match the grey paint on the interior.  Made up of many carpets and cushions, the kit is extremely comfortable and good looking.  It is so comfortable, in fact, that one of the students took a nap in the cockpit.


  We also filled the coolant reservoir with engine coolant.  The RV-12 kit comes with checklists that must be satisfied prior to inspection.  These lists include everything from avionics to restraining devices.  We were able to progressively work through most of the avionics lists.  One of the checklists requires that the builder calculate the maximum fuel flow using only the boost pump located close to the fuel tank.  In order to satisfy this, we added fuel to the tank and, using a scale, stopwatch, and gas can, determined the maximum fuel flow provided by the boost pump.  It passed the test easily.  If everything goes well, hopefully we will start the engine next week.

Day 58 - March 2, 2013

This weekend we continued finishing minor details and began setting up the Skyview system.  After updating some of the hardware, we got the system to acknowledge the presence of the autopilot servos, ADAHRS unit, GPS, EMS, and transponder.  We calibrated the autopilot, but still have quite a few more things to calibrate before we are finished with the Skyview setup.    


The last section of the plans details where to apply the various placards and stickers on the airframe.


Also, we were able to change the placement of two wires in one of the harnesses so that the lights now do what the switch says they should do.

Day 57 - February 23, 2013

As we flipped through the plans, we came across a page that somehow we had skipped over.  A wire retainer was supposed to have been installed underneath the firewall shelf and above the rudder pedals.  We laid down in the airplane for quite a while with a mirror and flashlight before we were finally successful.


We installed the hinge and latch in the map box to complete it.


Throughout the day we installed both wings and trimmed the both wing roots in order to make room for the foam/rubber seal between the wing and the fuselage.


A few of us wired up and attached the cabin light.  It is a small, red LED that is meant to illuminate the cabin at night with a nice red glow.


Also, while the wings were on, we tested the wingtip lights.  The lights did not do exactly what the switch told them to, but after looking on a mentor's IPad, we found a recent notification that two of the wires in the harness had been inserted wrong at the factory.  Unfortunately, we did not have the tool to extract the micro pins, but thankfully we now know what the problem is and will be able to fix it.


More next week!